CUSTOM WALLPAPER FOR FREE
Free DIY Custom Wallpaper wall using materials you probably already have!
YIPPEE!! I love free things (and I cannot imagine I am alone on this!) There is nothing more satisfying than getting a large bang for your buck and this project has such a great return that I just had to give you the inside scoop. I am going to give you a quick run down on a project that I did a bit back. I should have made an actual tutorial about it, but I had no idea how many people would ask me about it back then. Oh well. I think you can catch on fast, right?!
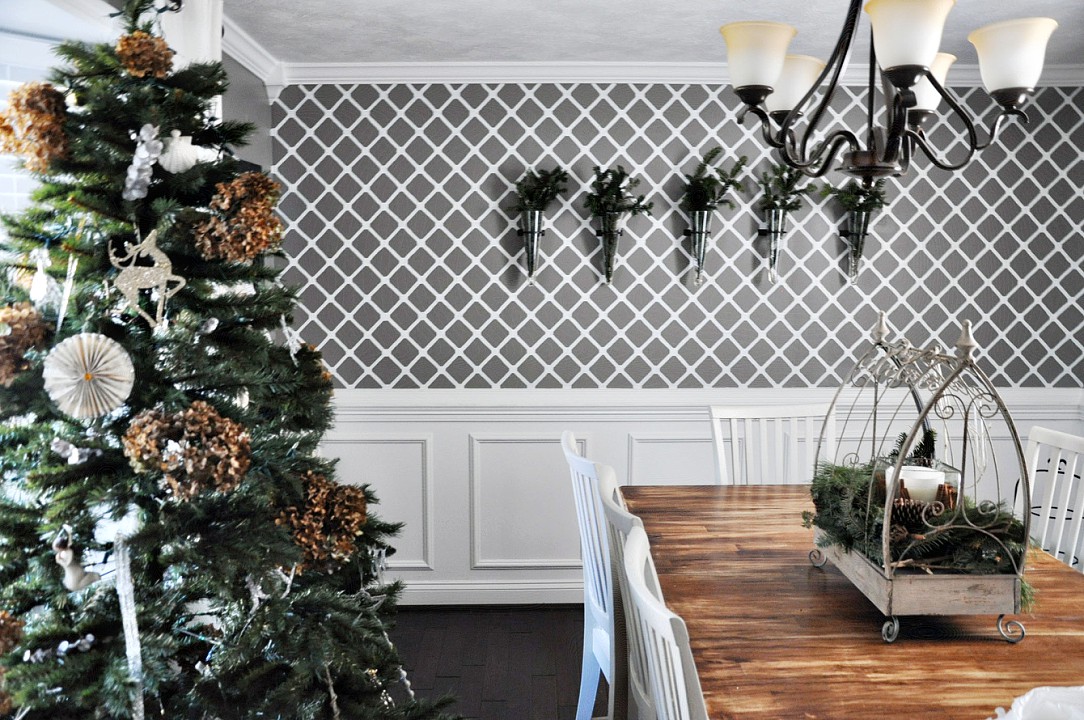
This wall in my home is painted, not wallpapered. I did not want the hassle and commitment of wallpaper when I decided to add a feature wall to this room, but I knew I wanted some level of impact beyond just paint. So, I figured I would paint my own wallpaper.
To do this, there are several sites that sell laser cut patterns and graphics, but most of them are $20-80 dollars each for the pattern and I could not find the diamond pattern I was dreaming up. Plus, I did not want to commit to the money or the shipping time and wait for the pattern (when I get an idea, I become QUITE impatient).
So while I was contemplating a lot of things (like making my own stencil...probably a bad idea), I also realized it had been awhile since I changed the air filters in our home (I know this is scattered, but this is how my brain works). As I got the filters out, I noticed a hidden gem....my pattern! Yup. I was so excited! There it was, perfectly thick, laser cut and uniform, the back side of my air filter contained just the pattern I was looking for! Even better, I was about to throw the gross part of the filter out, so I just quickly cut the back of the filter off and there was my pattern. SUCCESS!
You can buy this here from Walmart
I knew I could just tape the pattern to the wall with painter's tape, trace the pattern, reposition it again, trace again, and so on until I finished tracing the pattern on the wall. Then I would just use a little tiny paint brush to fill in the gaps with paint that I already had from doing the trim in that room. Brilliant! I figured this project would take me about four hours.
This is where the story comes to a screeching halt. Enter my husband. He asks me what my plan is, and I explain my brilliant idea. He likes the idea, and then asks me how long I think it will take (which, by the way, he always does because he has an incredible sense that can identify when I have completely lost touch with reality). I promptly reply it will take me four hours. He replies, "Four hours today? How many tomorrow?" I was shocked that he would doubt my timeline. I was certain that this project would possibly take me more than four hours.
You know where this is going. In my defense, the project did take me four hours, three times :) It was a little (LOT) more time intensive than I realized (score yet another point for my husband), but oh my, have I loved the results. A couple of points that I learned in doing this:
1. Your walls might not be fully level, so I had to fudge some areas to make sure they were good enough.
2. Plan for two coats of paint. After the first coat of paint, I realized it was going to require a second to really look right (that was a depressing moment).
3. Imperfection is part of this project. Accept it (or potentially go crazy as an alternative...although when you see the doctor and you start explaining what you are doing, you will probably get that diagnosis anyway). Most people tell me I am crazy for a lot of reasons, though, so that is nothing new for me.
In the end, the 12 hours was totally worth it. Not only did I not have to mess with trying to wallpaper old and uneven walls, but there has been no seam weakening or peeling like you can get with wallpaper over time. Plus, the project did not cost me a dime. Even if you have to buy everything new, you can pick up all the materials for less than ten bucks. Not bad for a lot of impact.
Remember, it seems a little crazy for some, but this project is super forgiving. You don't have to be perfect for it to look nice. No one is going to stick there face right up into and see if you have a little shaky hand brush stroke someplace (and If they do, then maybe they are not really your friend :) People will think it looks amazing, even if imperfect!
Perfectly imperfect
It was truly that simple. I wish I had more "how to" photos to show you, but it honestly was just taping the pattern to the wall, tracing with a pencil, and then painting it in.....plus a whole lot of patience.
Will you give it a try??
Casey


